The green screen effect, also known as chroma keying, is a powerful tool that can transport your video’s subject anywhere in the world, or even to imaginary places. Using iMovie on your Mac, you can easily remove a solid-colored background and replace it with a different video or image. This guide will walk you through everything you need to know, from setting up your shot to making final adjustments for a professional-looking result.
What is the Green Screen Effect?
The green screen effect is a visual technique that lets you superimpose one image or video stream over another. By shooting a subject in front of a solid green (or blue) background, video editing software can digitally identify and remove that specific color, making it transparent. This allows you to place a separate background layer behind your subject.
This technology works because the software isolates a specific color hue, the “chroma key,” and makes all pixels of that color transparent. Green is often used because it is the furthest color from human skin tones, reducing the chance of your subject being accidentally removed during the editing process. It’s the same technique used in Hollywood blockbusters and by your favorite YouTubers to create stunning visual effects.
iMovie’s built-in tool analyzes your footage for this specific color. It then gives you simple controls to refine the effect, ensuring a clean and seamless blend between your subject and the new background you’ve chosen.
Preparing Your Footage for the Best Results
Before you even open iMovie, the quality of your final video depends heavily on how you prepare and shoot your footage. Taking a few extra minutes to set up your shot correctly will save you hours of frustration during editing. A clean, well-lit green screen shot is the foundation of a believable effect.
The most important element is your background. Ensure your green screen is a solid, uniform color and is as smooth as possible. Wrinkles and shadows can create different shades of green, which can confuse the software and lead to a blotchy, unprofessional result. Also, choose a background image or video that complements your subject rather than distracting from it.
Proper lighting is equally critical for a clean key. Your goal is to light the green screen and your subject separately and evenly. This prevents the subject from casting shadows on the screen and avoids “hot spots” or overly bright areas.
- Use soft, diffused lighting on your green screen to eliminate harsh shadows.
- Position lights at a 45-degree angle to both your subject and the screen for balanced illumination.
- Ensure the green screen is lit evenly from side to side and top to bottom.
This careful setup ensures that iMovie has a single, consistent shade of green to remove, which is the key to a professional-looking video.
Getting Started with iMovie on Your Mac
With your footage ready, it’s time to bring it into iMovie. If you don’t already have iMovie, you can download it for free from the Mac App Store. It’s a good idea to make sure you have the latest version installed to access all the current features and ensure the best performance.
The first step in any project is importing your media. You need to import both your green screen clip (the foreground) and the background video or image you plan to use.
Importing media into iMovie is a simple drag-and-drop process. You can open Finder and drag your files directly into the iMovie media library. Alternatively, you can click the “Import Media” button in the iMovie toolbar to browse for your files. Once imported, your clips will be visible and ready for you to start building your project on the timeline.
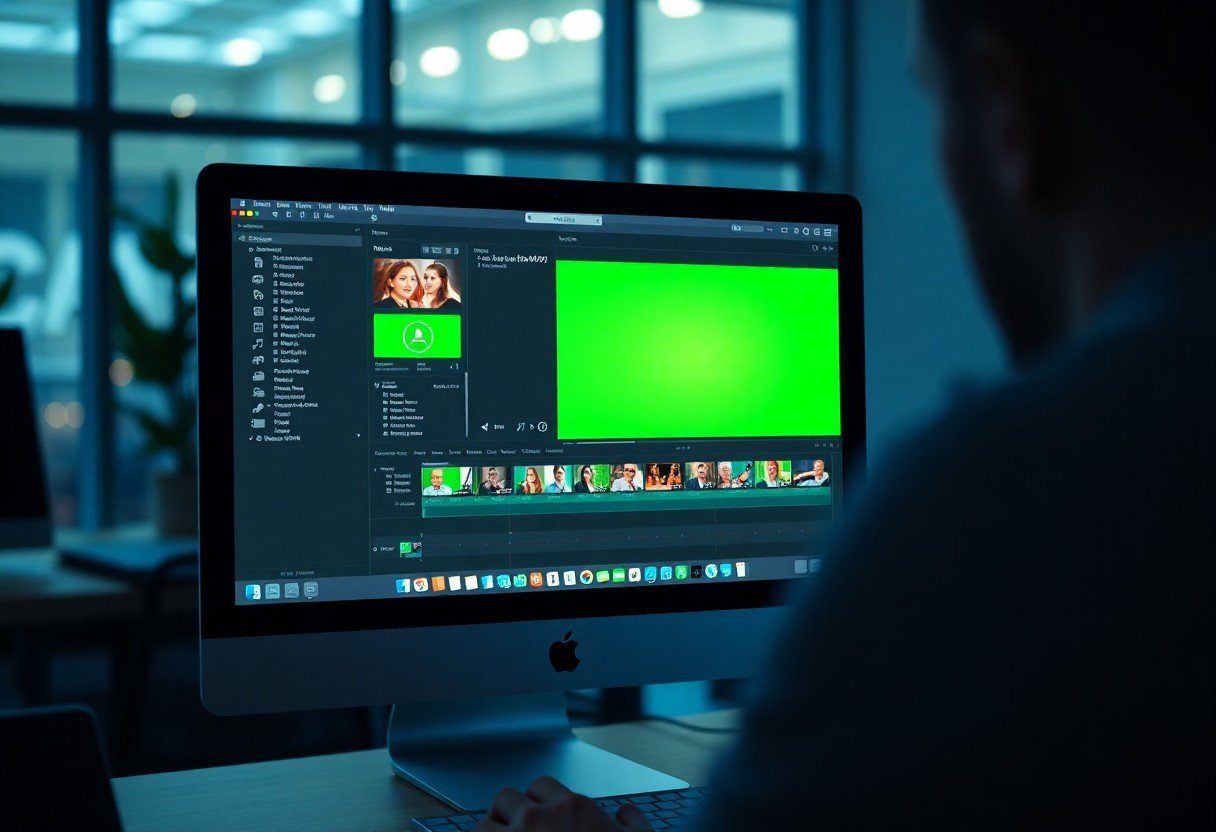
How to Apply the Green Screen Effect Step-by-Step
Once your clips are in the iMovie library, applying the effect is a quick and straightforward process. The key is to place your clips in the correct order on the timeline, with the green screen footage layered on top of the background footage.
Follow these simple steps to apply the effect:
- Drag your background video clip or image to the timeline. This will be the bottom layer.
- Next, drag your green screen clip and place it directly above the background clip in the timeline.
- Select the green screen clip (the top clip) on the timeline by clicking on it. It should have a yellow border.
- Above the video preview window, click the “Video Overlay Settings” button, which looks like two overlapping squares.
- From the dropdown menu that appears, select “Green/Blue Screen.”
iMovie will automatically detect and remove the green background, revealing the background clip you placed underneath. Your subject will now appear to be in the new scene.
Fine-Tuning Your Green Screen Video
After applying the basic effect, you may notice that the edges around your subject look a bit rough or that there is a slight green tint on them. iMovie provides simple but effective tools to clean this up and make the composition look more natural and believable.
In the “Video Overlay Settings” where you selected “Green/Blue Screen,” you’ll see a few adjustment controls. The “Softness” slider is one of the most useful tools. Increasing the softness helps to blend the edges of your subject with the new background, removing any harsh or jagged lines. Be careful not to set it too high, as this can make the edges look blurry.
You can also use the cleanup tool, which looks like an eyedropper, to refine the key. If parts of the green screen are still visible, you can use this tool to click on those areas in the preview window to remove them. Experimenting with these settings is the best way to achieve a seamless and professional integration.
Common Mistakes to Avoid for a Professional Look
Many beginners make a few common mistakes that can detract from the final video’s quality. Being aware of these pitfalls will help you create a much more convincing green screen effect. The two biggest culprits are poor lighting and inconsistent backgrounds.
Uneven lighting is the number one cause of a bad green screen effect. If your background has bright spots and dark shadows, iMovie will struggle to remove the color cleanly, often leaving behind digital noise or jagged edges around your subject. Similarly, if your subject is not lit properly, they may not blend well with the new background.
| Good Practice | Common Mistake |
|---|---|
| Use a smooth, wrinkle-free green screen. | Using a wrinkled or textured background. |
| Light the screen and subject separately. | Using a single light source for everything. |
| Keep the subject’s clothing a non-green color. | The subject wears clothing similar to the screen color. |
Another issue is background inconsistency. If your green screen is not a solid, uniform color, it will be very difficult for the software to key it out properly. Always use a backdrop designed for chroma keying for the best results.
Frequently Asked Questions
What if I don’t have a green screen?
While a dedicated green screen is best, you can use any large, solid-colored surface, such as a bright blue sheet or a wall painted a uniform color. Just make sure the color is not present in your subject’s clothing or props.
How do I fix the green halo or spill on my subject?
A green halo or “spill” is when the green light from the screen reflects onto your subject. You can minimize this by moving your subject further away from the screen during filming. In iMovie, carefully adjusting the “Softness” control can also help reduce the appearance of a green fringe.
Can I use an image instead of a video for the background?
Yes, you can use either a high-resolution image or another video clip as your background. Simply drag the image to the timeline in the same way you would a video clip and place the green screen footage above it.
Why do parts of my subject look transparent?
This usually happens if your subject is wearing clothing or has props that are too close in color to the green screen. To avoid this, ensure your subject wears colors that contrast sharply with the background. Green and its surrounding shades should be avoided entirely.


Leave a Comment