TECH
How to Easily Test Your Microphone on MacBook Air Step by Step
Microphone issues can interfere with your virtual meetings and online recordings, making it critical to ensure your MacBook Air’s microphone works correctly. This comprehensive guide explains how to test your microphone, verify sound quality, and troubleshoot problems, whether you use the built-in or an external mic. Get ready to optimize your audio experience for clear, confident communication.
Understanding Your MacBook Air’s Microphone
The MacBook Air is equipped with a built-in microphone designed for crisp audio during calls, recordings, and voice commands. Knowing how your microphone works and its capabilities is the first step toward achieving the best audio output. Most recent MacBook Air models feature a high-quality array microphone, but you might also use external USB microphones for advanced needs.
Microphone performance can be influenced by several factors, such as hardware configuration, software settings, and environmental noise. By understanding the strengths and limitations of your microphone, you’ll be better prepared to troubleshoot issues and make the most of your device during online meetings or recordings.
Different microphone types provide unique benefits. Built-in mics are convenient, but external USB mics offer enhanced quality and customization. Your use case will determine which type is best for you.
| Microphone Type | Characteristics |
|---|---|
| Built-in Array | Good for general use, easy to access, moderate quality |
| Directional | Picks up sound from one direction, reduces background noise |
| Omnidirectional | Captures sound from all directions, ideal for group recordings |
| Noise-Canceling | Filters background noise, suitable for noisy environments |
| External USB | High audio quality, customizable settings, great for professionals |
Common Microphone Issues on MacBook Air
Even with reliable hardware, microphone issues can occur and disrupt your work. It’s important to recognize common problems so you can quickly address them and restore clear audio.
Typical microphone issues include:
- Low or muffled audio
- Background noise during calls or recordings
- Microphone not being recognized by the system
These problems often stem from muted input settings, incorrect input source selection, software conflicts, or hardware malfunctions. Sometimes, environmental noise or interference from other devices can also impact the quality and volume of your microphone’s audio input.
By staying aware of these common issues, you’ll be able to troubleshoot more efficiently and minimize disruptions during important calls or recordings.
How to Access and Configure Sound Settings
Accessing and adjusting sound settings is the essential first step in ensuring your MacBook Air’s microphone functions properly. Here’s how you can navigate to and manage these settings:
Click the Apple logo in the top-left corner of your screen and select “System Preferences.” Next, choose the “Sound” option. In the Sound menu, click the “Input” tab. This section lists all available microphones connected to your MacBook Air, including built-in and any external mics.
Adjust the input volume slider to set the microphone sensitivity. Speak into your microphone and watch the input level meter. The bar should move with your voice. If it’s not responding, try increasing the input volume or switching to another input device. Setting the right input level ensures your voice is captured clearly without distortion or background noise.
It’s also important to check that your microphone is not muted and that the correct device is selected, especially if you have multiple microphones connected. This simple check can resolve many basic audio input issues.
Testing Microphone Functionality with Built-in Tools
Once you’ve configured your sound settings, it’s time to test the microphone to confirm it’s working as expected. MacBook Air provides several built-in tools for microphone testing:
- Voice Memos: Open the Voice Memos app, click the record button, and speak into your microphone. Playback the recording to check audio clarity and volume.
- QuickTime Player: Launch QuickTime Player, select “New Audio Recording,” and speak into the microphone. Listen to the playback for any issues.
Both apps are straightforward and effective for quickly verifying microphone functionality. If you hear static, low volume, or unclear audio, you may need to adjust settings or check for software updates.
For a more detailed test, you can use FaceTime or Zoom to make a test call and ask the recipient if your audio is clear. This step helps identify issues that may only appear during real-time communication.
Utilizing Third-Party Applications for Advanced Testing
If you need in-depth analysis of your microphone’s performance, third-party apps like Audacity and GarageBand are excellent options. These tools offer advanced features for audio recording and editing, allowing you to examine sound waves and frequencies in detail.
Audacity, for example, lets you record audio, visualize waveforms, and adjust various parameters. You can also apply filters to reduce background noise and enhance your voice. GarageBand provides a user-friendly interface for multi-track recording, making it suitable for podcasters, musicians, and content creators.
Using these applications helps you pinpoint specific issues, such as distortion, echo, or inconsistent volume. They also provide valuable feedback on how your microphone captures sound in different environments, empowering you to optimize audio quality further.
Troubleshooting Microphone Problems
When your microphone isn’t working as expected, a systematic troubleshooting approach can quickly resolve most issues. Begin by double-checking your MacBook Air’s sound settings to ensure the correct microphone is selected and input volume is adequate.
Next, verify all physical connections if you’re using an external microphone. Unplug and reconnect your mic, and if possible, test it on another device. If the microphone still isn’t detected, try restarting your MacBook Air, as this can resolve temporary software glitches.
It’s also important to check for software updates. Outdated macOS or apps can cause compatibility problems. Go to the Apple menu, select “System Preferences,” then “Software Update” to ensure your system is current.
If your microphone works in some applications but not others, check app permissions in “System Preferences > Security & Privacy > Privacy tab.” Ensure the problematic app has access to the microphone.
Tips and Best Practices for Optimal Microphone Performance
Maximizing your microphone’s performance enhances every virtual meeting and recording. Here are some essential tips:
- Keep your microphone clean and free from dust.
- Adjust gain and input levels for balanced audio.
- Position the microphone close to your mouth but not too near to avoid popping sounds.
Whenever possible, use high-quality recording or streaming software. Regularly test your microphone before important calls to catch problems early. Good maintenance ensures your microphone lasts longer and produces clear, reliable audio.
Environmental factors also matter. Record in a quiet space with minimal background noise. Use sound-absorbing materials, like curtains or carpets, to reduce echo. If you use an external microphone, consider investing in a pop filter or foam cover to further improve sound clarity.
Other Factors Affecting Microphone Quality
Beyond hardware and software, other elements can influence your MacBook Air’s microphone quality. These include:
- Background noise levels in your environment
- Audio input and gain settings
- Placement and distance from your mouth
External interferences, such as nearby electronic devices or poor room acoustics, can distort sound. To minimize problems, avoid placing your microphone near other electronics, and create a dedicated, quiet space for calls or recordings.
Adjust your device’s input sensitivity and use built-in noise reduction features. These small tweaks can make a noticeable difference in your audio output, ensuring you are heard clearly in every situation.
Final Words
Testing and optimizing your MacBook Air’s microphone is essential for productive virtual meetings and high-quality recordings. By following the steps outlined in this guide, you can diagnose issues, fine-tune your microphone settings, and ensure reliable audio performance every time. Regular maintenance and smart setup are key to a seamless audio experience.
FAQ
How can I check if my microphone is working on my MacBook Air?
Open System Preferences, go to Sound, and select the Input tab. Speak into the microphone and watch the input level meter. If it moves when you talk, your microphone is working correctly.
What should I do if my microphone is not detecting sound?
First, confirm that your microphone is set as the input device in Sound settings. Raise the input volume, check hardware connections, and restart your MacBook Air. Also, look for any available software updates and reset PRAM/NVRAM if necessary.
How can I test my microphone using an app on my MacBook Air?
Use the Voice Memos app to record a short message. Listen to the playback to confirm your voice is clear and free of distortion. This simple test helps verify microphone functionality.
Are there third-party applications for testing my microphone?
Yes, you can use apps like Audacity or GarageBand for advanced microphone testing. These apps provide detailed feedback on audio quality, clarity, and frequency response.
Why does my microphone work in some apps but not others?
This is often due to app permissions. Go to System Preferences > Security & Privacy > Privacy tab, select Microphone, and make sure the problematic app has permission to access the mic. Restart the app or your MacBook Air if needed to apply changes.
-
 NEWS10 years ago
Samsung Releases Galaxy Note7 TV Ad as Reddit AMA Leaks Specs
-
 NEWS10 years ago
Android 7.0 Nougat Rolls Out To Nexus Devices With New Emoji, Features
-
 FINANCE8 years ago
Cardano Price Surges as ADA Enters the Crypto Top Ten List
-
 NEWS10 years ago
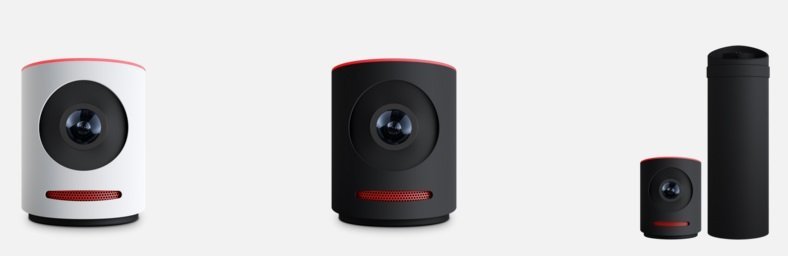
Pre-Order the First Camera Made for Facebook Live Streaming Video
-
 FINANCE11 months ago
Binance Suspends Trading and Withdrawals for a System Upgrade
-
 FINANCE8 years ago
RChain Price Jumps Nearly 150% to a New All-Time High of $2.03
-
 NEWS10 years ago
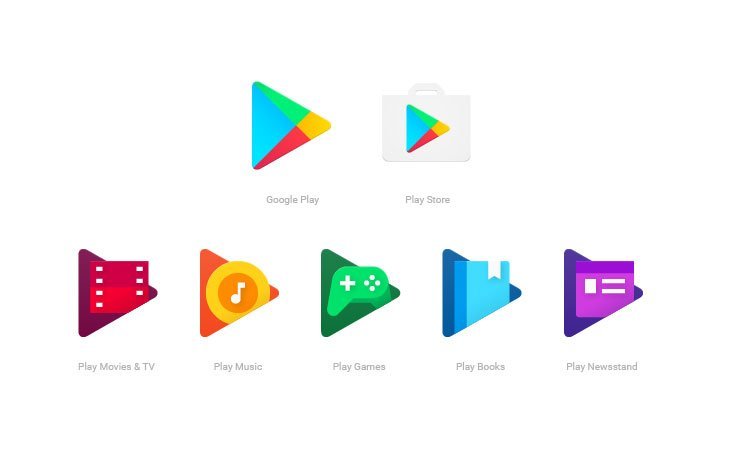
Google Play App Icons Get Fresh New Look: See the Latest Design Update
-
 NEWS10 years ago
Google Doodle Go Bananas Fruit Games Live On Mobile For Two Weeks